


If you've ever run a Google Lighthouse analysis of your website, you've probably encountered an error like "Serve static assets with an efficient cache policy" or "Leverage browser caching".
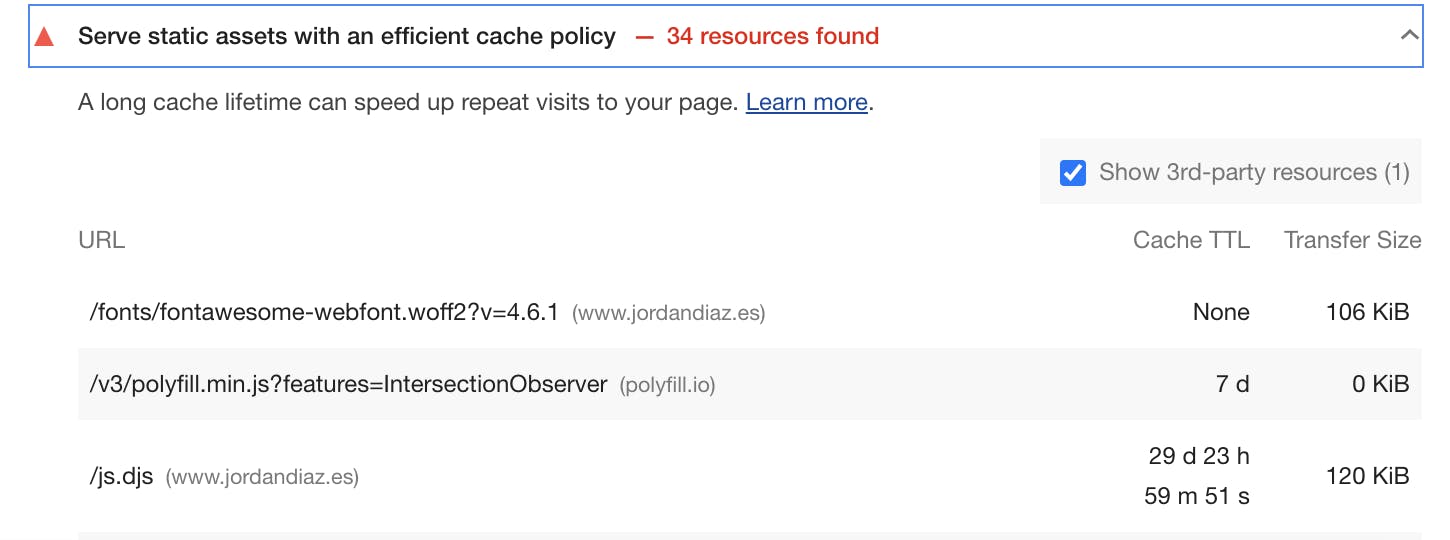
What's a static asset?
Static assets are files or resources you send to the user that the server does not change. Resources that do not change between different requests. Images, fonts, CSS, or JS files are good candidates to be considered as static assets in your website.
What's a cache policy?
Imagine we enter a new website. Our browser will (probably) download some CSS and JS files, as well as some images. When we click on a link, our browser would start a new request and download the files and images again. Does this make sense? Isn't it smarter to just download what we didn't download one minute ago?
You, as a developer, can set a cache policy, which means that you can tell the browser which kind of files should it store in the cache memory, and after how much time should these files be deleted from the cache.
This way, we could tell browsers to keep, for example, the logo of our company cached for a long time, so users only have to download it once.
How does static asset caching affect my page speed?
Caching ensures that your page loads faster for returning users. Although it won't affect the first-page load, it will surely make further page loads much faster, even after shutting the computer off and entering back after a few days.
How can we leverage browser caching?
The main idea is that we have to tell the browser how long we want to store each file. This "how long" is called Time To Live (TTL). Each file will have an additional header Expires.
This header specifies a fixed date/time for the expiration of the cached version of the resource.
Creating an efficient cache policy for our static assets
Although it has great advantages, asset caching can also bring problems to your website. The most important problem is that, if not done properly, returning users may use an outdated version of a resource. This means that, for example, if we set a TTL of 1 month for our logo image, and we change it, returning users will still be seeing our old logo.
Please, refer to the Overwriting files section to see how we can easily solve this problem and take full advantage of the browser cache system.
We should have a minimum TTL of 1 month for static assets, although it's highly recommended to use 1 year as our Expires header in many cases.
Implementing an efficient cache policy with .htaccess
We can implement our cache policy just by adding the following snippet to our .htaccess file.
<IfModule mod_expires.c>
    ExpiresActive On
    ExpiresByType image/jpg "access 1 year"
    ExpiresByType image/jpeg "access 1 year"
    ExpiresByType image/gif "access 1 year"
    ExpiresByType image/png "access 1 year"
    ExpiresByType image/webp "access 1 year"
    ExpiresByType image/svg+xml "access 1 year"
    ExpiresByType font/opentype "access 1 year"
    ExpiresByType font/ttf "access 1 year"
    ExpiresByType text/css "access 1 year"
    ExpiresByType application/pdf "access 1 month"
    ExpiresByType application/javascript "access 1 year"
    ExpiresByType application/x-javascript "access 1 year"
    ExpiresByType application/x-shockwave-flash "access 1 year"
    ExpiresByType image/x-icon "access 1 year"
    ExpiresDefault "access 2 days"
</IfModule>
For this to work, we will need to have mod_expires.c installed in our Apache system.
With this snippet, we are telling our server to add a 1 year TTL to each of the mime types displayed there. If our server finds a file with an unlisted mime type, it will set the TTL to 2 days by default.
Implementing an efficient cache policy with .nginx
NGINX solution is pretty similar to our .htaccess solution. Here's the snippet of code we would use in NGINX to handle our cache policy:
map $sent_http_content_type $expires {
    default 2d;
    image/jpg 1y;
    image/jpeg 1y;
    image/gif 1y;
    image/png 1y;
    image/webp 1y;
    image/svg+xml 1y;
    font/opentype 1y;
    font/ttf 1y;
    text/css 1y;
    application/pdf 1M;
    application/javascript 1y;
    application/x-javascript 1y;
    application/x-shockwave-flash 1y;
    image/x-icon 1y;
}
server {
    server_name example.com;
    expires $expires;
}
The idea is the same. We tell our server to cache every listed mime type for a year and use 2 days for unlisted mimes. Simple, right?
Overwriting files
Although the caching policy is pretty simple to implement, we will need a solution for cases where we change our files.
For example, suppose you've cached your CSS files for a whole year, and you update your main CSS file after just a few days. Returning users would be using your outdated CSS until it reaches its TTL.
To overcome this problem, we need to know how does the browser know if some resource is cached or not. If you open your DevTools, this is how it would look to download a resource for the first time:

After the first time, subsequent downloads of static assets would appear as cached (see the Size column):
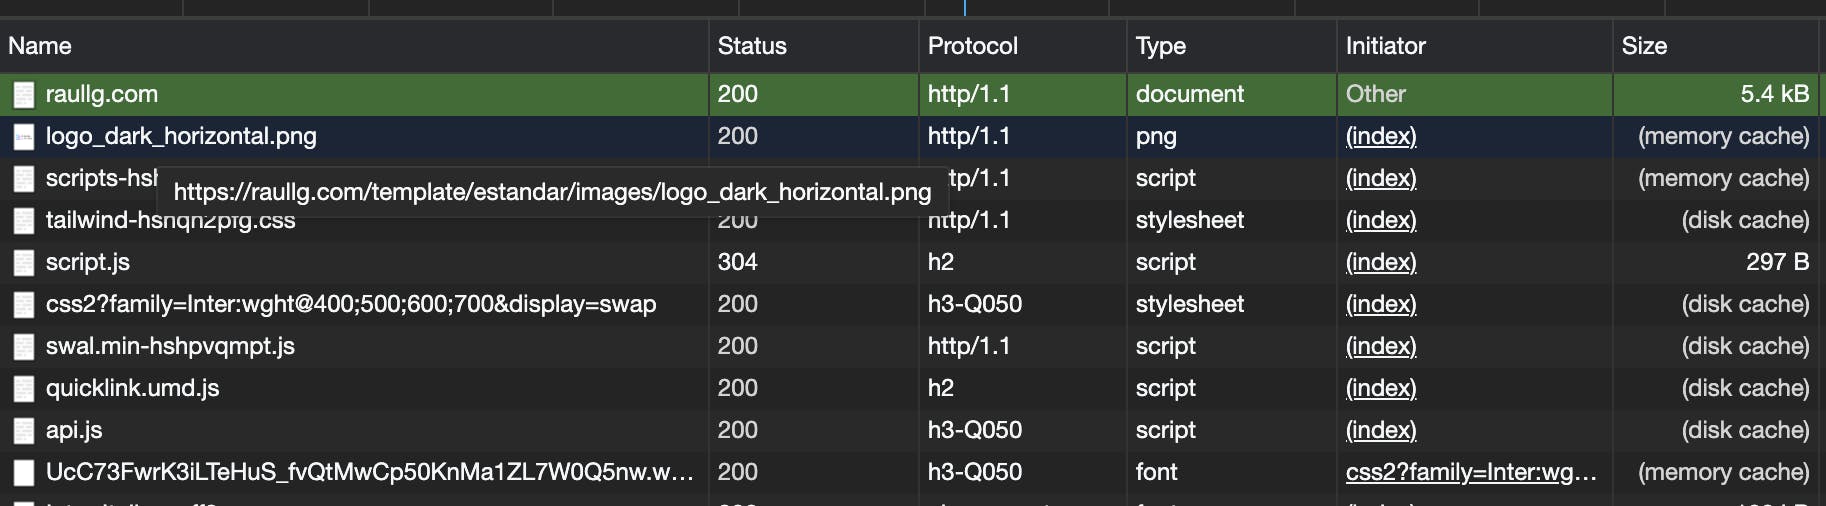
This means that our resources have been correctly cached by the browser! But, how?
Well, the browser has something like an internal mapping of URL → Cached Resource. In this case:
{
    "https://raullg.com/css/tailwind.css": {
        "contents": "file contents",
        "expires": "expiry date"
    },
    // ...
}
When the browser needs to download a resource, it will check if the resource URL exists in this internal mapping. If it does exist, it will check if it has not expired yet and, in that case, proceed to display the cached resource. If it's expired, then it will download it again and update the expiry date.
A very simple way to burst the cache of a certain file is to append a query parameter to the URL. If we change https://raullg.com/css/tailwind.css to https://raullg.com/css/tailwind.css?v=2, the URL won't match the internal mapping and the file would be downloaded and added to the map:
{
    "https://raullg.com/css/tailwind.css": {
        "contents": "file contents",
        "expires": "expiry date"
    },
    "https://raullg.com/css/tailwind.css?v=2": {
        "contents": "file contents",
        "expires": "expiry date"
    },
    // ...
}
This way, you don't need to change the file name to burst the browser cache and users will see the latest version of your file. But, how can we do this automatically?
Please, note that many projects may not need to implement cache bursting in images or fonts: they are less likely to change than a CSS or JS source code file. This is why the following sections are focused on cache bursting for CSS and JS files, although it should be possible to extend this behavior to every kind of static file.
Optimizing static assets cache using PHP
Bursting a file cache with PHP is pretty simple. We could easily create a function that reads a file and appends a query string to the URL.
We just need to make sure that this query string does not change until the file changes. There are two straightforward ways to do this:
Bursting static assets cache appending a hash to the URL
A hash is a mathematical function that will always return the same output for the same input, and it's unique. If you have a hash for a file and its contents change, even slightly, the hash will be completely different.
Let's look at an example of hashing using MD5 (test it yourself):
Contents: "Hi! My name is Raúl"
MD5 Hash: "25eb375b17970db528a0bb531d27ed32"
Contents: "Hi! My name is Raul"
MD5 Hash: "23c8782f4848214ceecaec6e78f2b777"
Note how, just by changing one character, the resulting hash is completely different.
Now, let's write our PHP function to append this hash to our file:
<?php

function mix($url) {
    // Prepend a slash to the URL if needed and if it's a relative URL
    if (strpos($url, '/') !== 0 && !strpos($url, 'http')) {
        $url = '/' . $url;
    }

    $localFilePath = __DIR__ . $url; // Change this line to match your file system

    // Only append hash if file exists
    if (file_exists($localFilePath)) {
        $hash = md5_file($localFilePath); // You can also use sha1_file()
        // Check if URL already has a query string
        if (strpos($url, '?') !== false) {
            $url .= '&h=' . $hash;
        } else {
            $url .= '?h=' . $hash;
        }
    }

    return $url;
}
With this function, you just need to call it from your template with your resource URL and it will handle the hashing :-)
<link rel="stylesheet" rel="{{ mix('/css/tailwind.css') }}" />
Bursting static assets cache appending a timestamp to the URL
Generating a hash from a file may be a long process which may delay our page load. Instead, we could also use the last time our file was modified to burst the file cache.
The main drawback of this approach is that if we revert the file to a previous state, it would return a different timestamp (because we modified the file), and the browser would download it again, even if it's exactly the same as a previous version.
Now, let's write our PHP function to append this hash to our file:
<?php

function timemix($url) {
    // Prepend a slash to the URL if needed and if it's a relative URL
    if (strpos($url, '/') !== 0 && !strpos($url, 'http')) {
        $url = '/' . $url;
    }

    $localFilePath = __DIR__ . $url; // Change this line to match your file system

    // Only append hash if file exists
    if (file_exists($localFilePath)) {
        $time = filemtime($localFilePath);
        // Optional: Convert the timestamp (integer) from base10 to base36 to generate a shorter query string
        $time = base_convert($time, 10, 36);
        // Check if URL already has a query string
        if (strpos($url, '?') !== false) {
            $url .= '&t=' . $time;
        } else {
            $url .= '?t=' . $time;
        }
    }

    return $url;
}
Then, within our template:
<link rel="stylesheet" rel="{{ timemix('/css/tailwind.css') }}" />
Optimizing static assets cache with Laravel Mix using PHP
Luckily, Laravel has this already handled for us. It's called Laravel Mix. Apart from compiling our JS and CSS assets, it can also handle file versioning.
Just by adding the following snippet at the end of our webpack.mix.js file:
if (mix.inProduction()) {
    mix.version();
}
Additionally, we would need to use the global mix() function in our blade template:
<link rel="stylesheet" rel="{{ mix('/css/tailwind.css') }}" />
And Laravel automatically will append the file hash to the URL when compiled for production!
Optimizing static assets cache with Express using NodeJS
ExpressJS does not have (yet) a native way to perform this hashing, so we need to use a third-party library to handle this for us: Staticify. You can install it by running the following command:
$ npm install staticify
To use it:
const path = require('path');
const staticify = require('staticify')(path.join(__dirname, 'public'));

// ...
app.use(staticify.middleware);

app.helpers({getVersionedPath: staticify.getVersionedPath});
And, in your template:
<link href="${getVersionedPath('/home.css')}" rel="stylesheet">
Optimizing static assets cache with Django using Python
Cache busting in Django is pretty easy. You just need to use the ManifestStaticFilesStorage, and it will automatically append the MD5 hash to file paths.
To enable the ManifestStaticFilesStorage, you have to meet the following requirements:
- the
STATICFILES_STORAGEsetting is set to'django.contrib.staticfiles.storage.ManifestStaticFilesStorage' - the
DEBUGsetting is set toFalse. - you’ve collected all your static files by using the
collectstaticmanagement command.
In your settings.py file:
DEBUG = False
STATICFILES_STORAGE = 'django.contrib.staticfiles.storage.ManifestStaticFilesStorage'
Then, in your template:
{% load static from staticfiles %}
<link rel="stylesheet" href="{% static 'css/base.css' %}" />
Summary
We've seen how we can leverage browser caching by setting up a long-term caching strategy and updating our pipeline to include asset versioning.
Also, I think it's really important to have the right caching strategy. Not only to improve your Search Engine Optimization but to improve the User Experience while using your website. There's no user that doesn't want a website to be slower! I hope this article helps you improve your site speed